POS HARDWARE - Installation Guide
INSTALLING POS HARDWARE TO GYM INSIGHT
This guide is for the installation and settings that need to be configured prior to using the POS Hardware properly. Please enjoy this video guide, for those who prefer step by step instructions follow below.
For Gym Insight POS hardware to function properly, users must only use either Google Chrome or Microsoft Edge as your web browser (Firefox and Safari are not supported for POS Hardware, although may be used for all other non-POS Hardware Gym Insight workstations).
-This guide is intended to followed in sequential order-
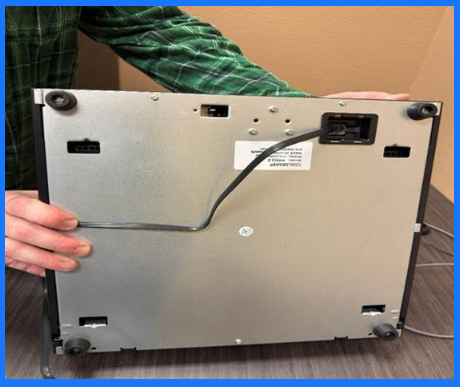
1) For printer configuration, remove the bottom of the printer as seen below.
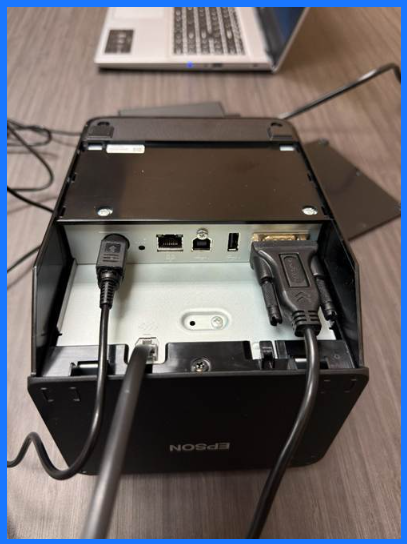
1a) Plug the power cord in carefully, as it has 3 pins inside the plug that need to be lined up. Please plug in like seen in the photo; also, plug in the cash drawer RJ12 wire (looks like a traditional phone line wire). Lastly, plug in the Serial-to-USB cord with the serial port plugged into the printer and the USB to the computer. If installing on a Mac computer, you will use the included USB cord for the printer and connect to the USB on the printer as well as to a USB port on the Mac computer. Carefully place the bottom printer cover back on, being sure not to pinch any wires.
1b) Take the phone-like line (RJ12) from the printer and plug it into the bottom of the cash drawer, as seen here.
2) Connect your Zebra Scanner to the included cable for the scanner and then plug the USB into the computer. The scanner will need to have configuration codes scanned. Please refer to either the included instruction manual for these codes or refer here to Gym Insight’s Knowledge Base Article on the Zebra Scanner. Please scan the USB CDC Host Code. This will program the scanner to be detected not as a USB but as a COM port, which is necessary to function properly.
CONFIGURING AND ADDING HARDWARE TO GYM INSIGHT
Now that the hardware has been connected and powered on, it is time to configure and connect inside of Gym Insight.
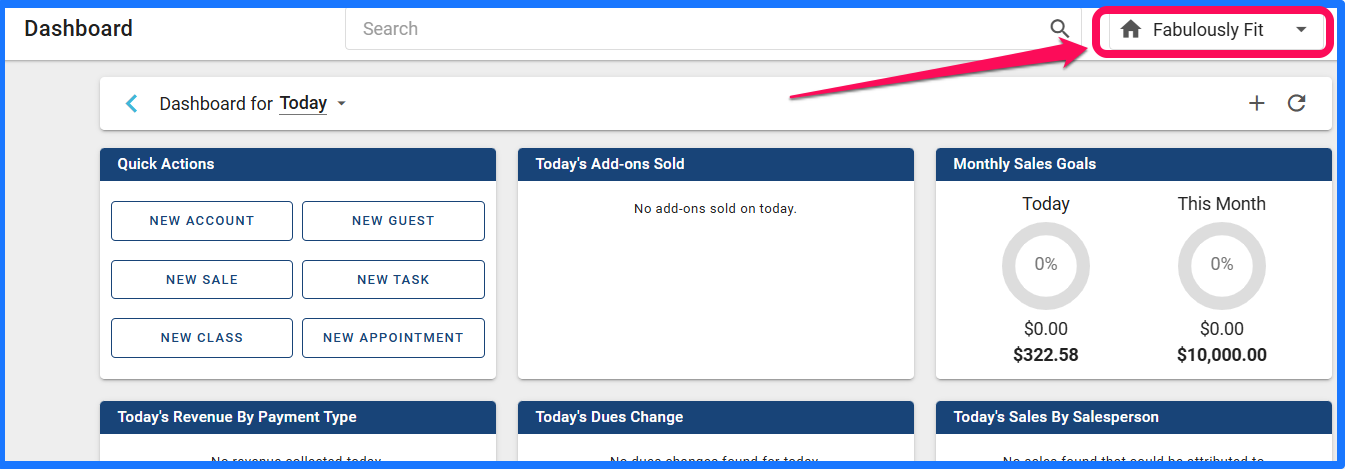
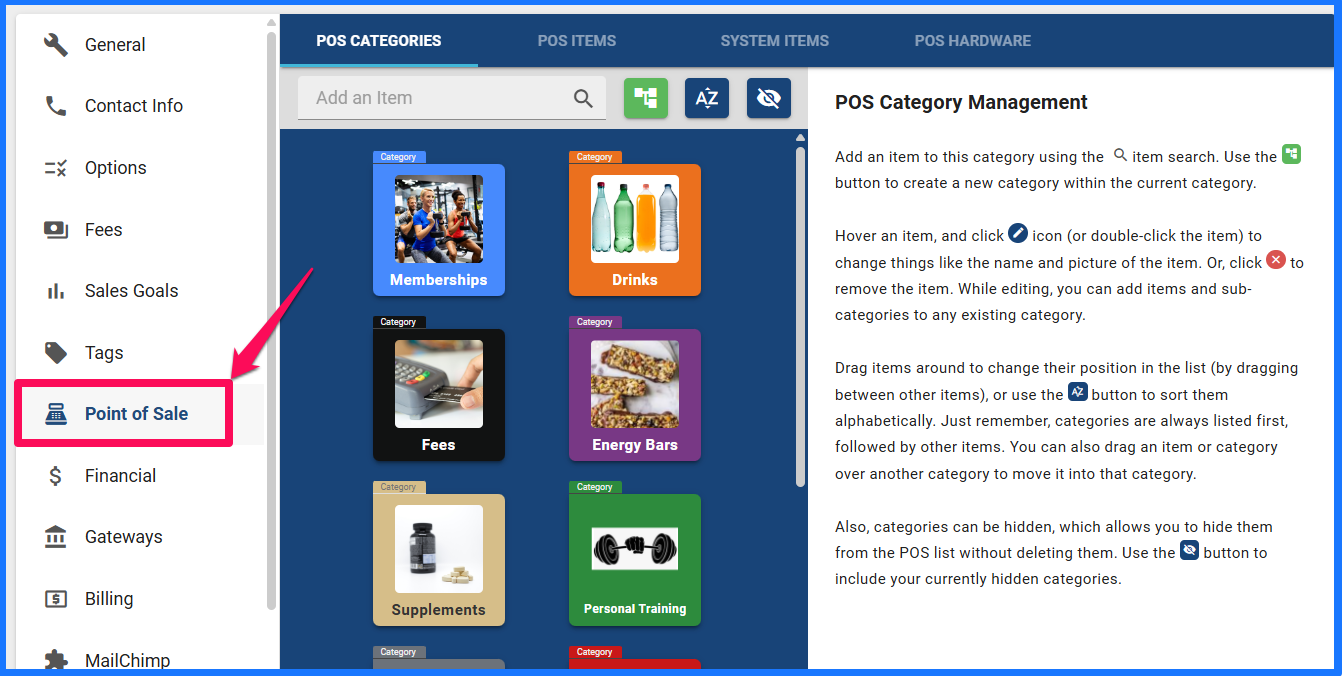
Please log in to Gym Insight with your owner-level account. From your Dashboard, navigate to the home menu drop-down, represented by a house next to your location’s name.
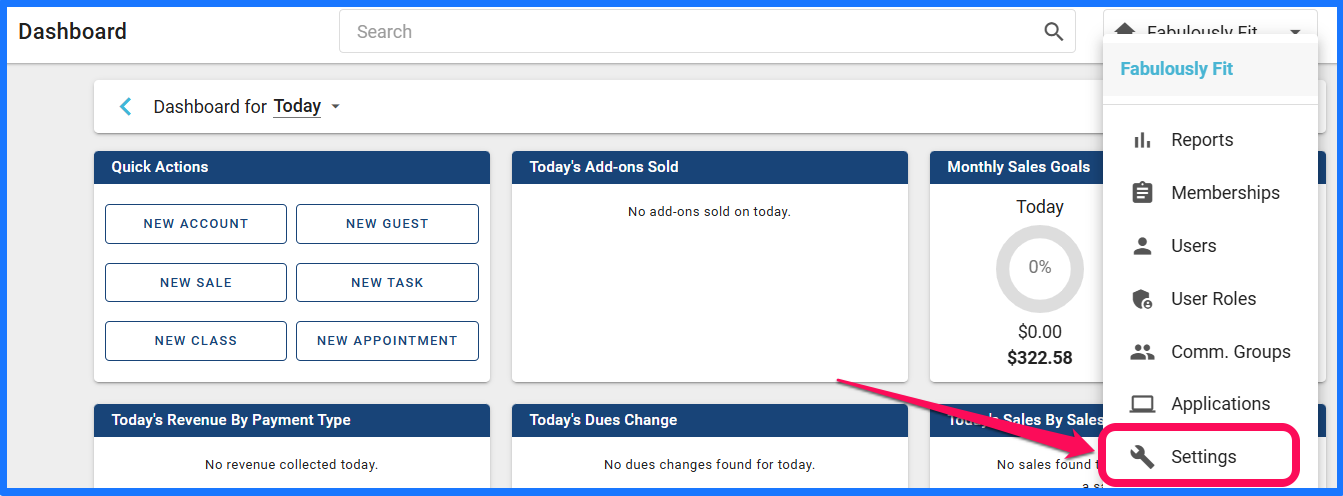
1) In the drop-down menu, navigate to Settings.
2) Once the General Settings screen loads, click on Point of Sale, below Tags and above Financial.
3) In the Point of Sale screen, click on the POS Hardware. Then Enable Point of Sale Hardware.
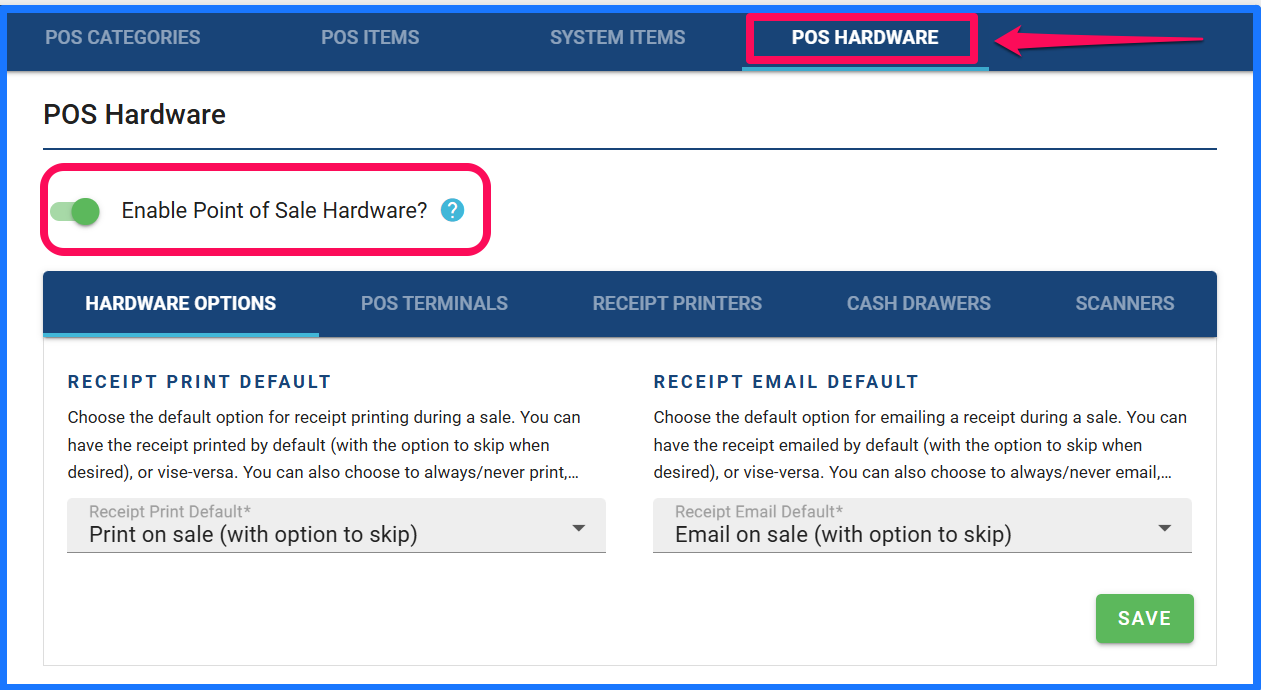
Hardware Options
Once the Point of Sale Hardware is enabled, we will be able to start configuring the individual components. The first configuration is the Hardware Options- these two options will configure your Receipt Printer and Receipt to Email default options.
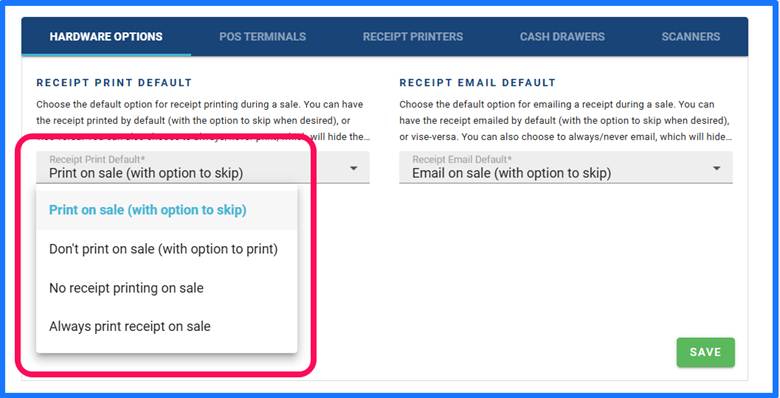
Receipt Print Default options:
- Print on sale(w/option to skip),
- Don’t print on sale (w/ option to print),
- No Receipt printing on sale
- Always print a receipt upon sale
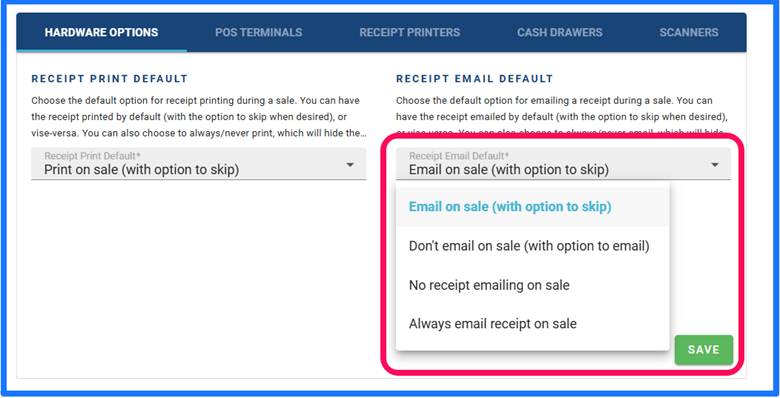
Next is for the Receipt Email Default options:
- Email on sale (w/option to skip),
- Don’t email on sale (w/ option to email),
- No Receipt emailing on sale
- Always email a receipt upon sale
POS TERMINALS
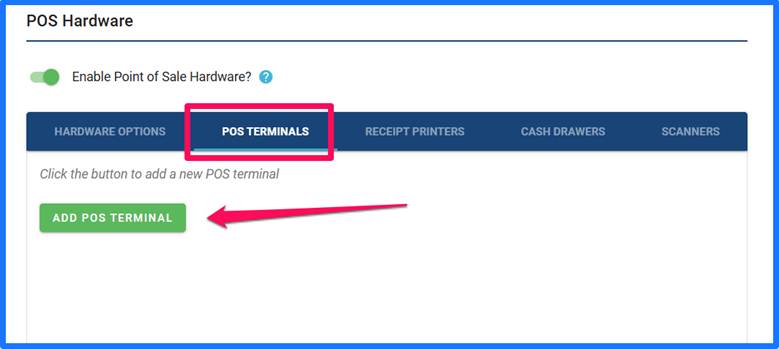
The POS Terminals screen is where the Terminals that will be used for POS will be added.
You can create more than one terminal, depending on how much equipment you purchase.
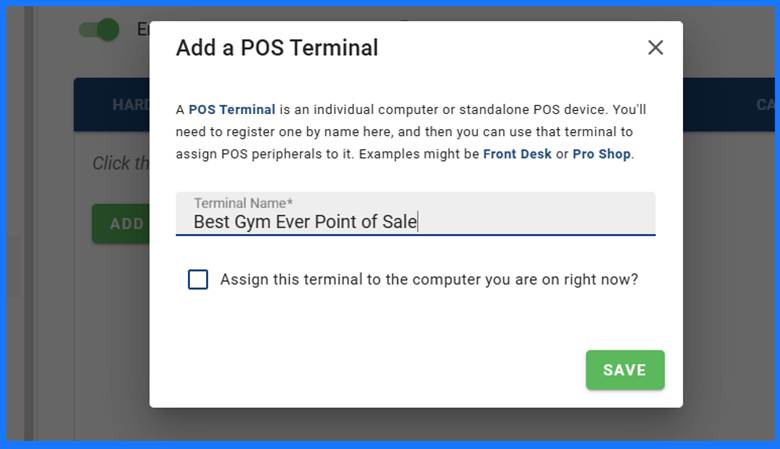
1) Click the ADD POS TERMINAL button. A pop-up window will appear, where you can name your custom terminal. It is important if creating more than one POS Terminal that you have the proper hardware for configuration and that the name appropriately describes the terminal, example Front Desk, Smoothie Bar, etc.
1a) You will have an option to “Assign this terminal to the computer you are on right now?” this option assigns the terminal you created to the machine being used. If you are setting up a singular POS location for your establishment, it is highly recommended that the GM or above who are configuring this system and these devices, “Assign this terminal to the computer you are on right now?”, it will save in the browser, and use the same browser to continue this terminal being assigned.
RECEIPT PRINTERS
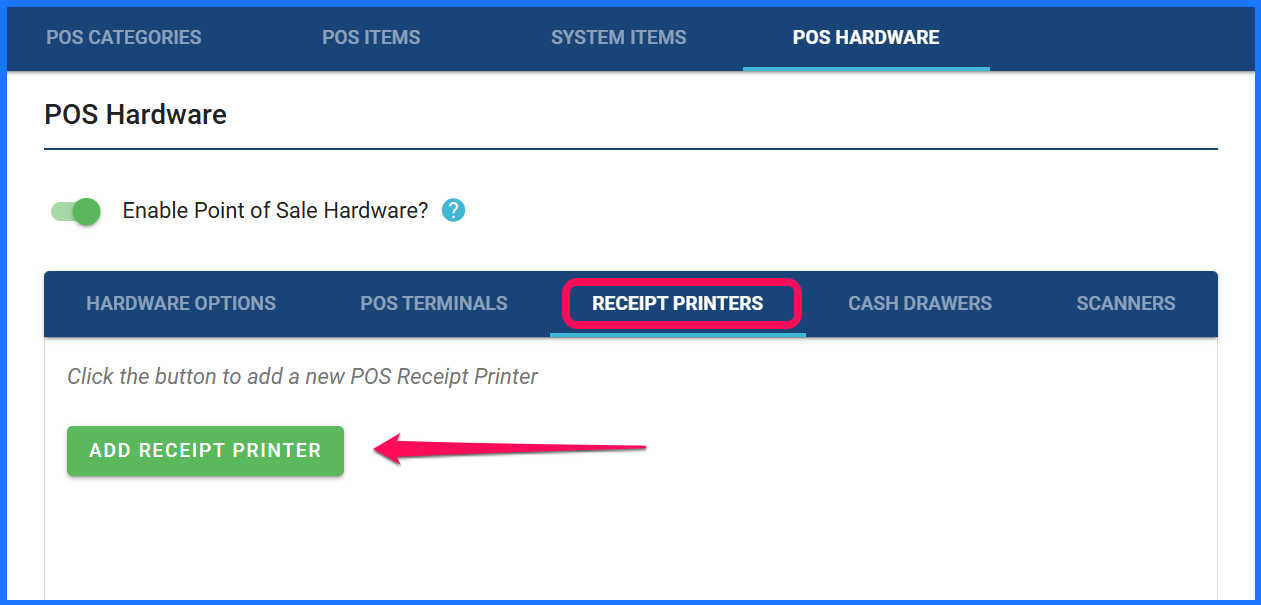
1) The Receipt Printer options page is where the receipt printer is added. Please ensure the printer is powered on and still plugged in. Click the Add Receipt Printer button.
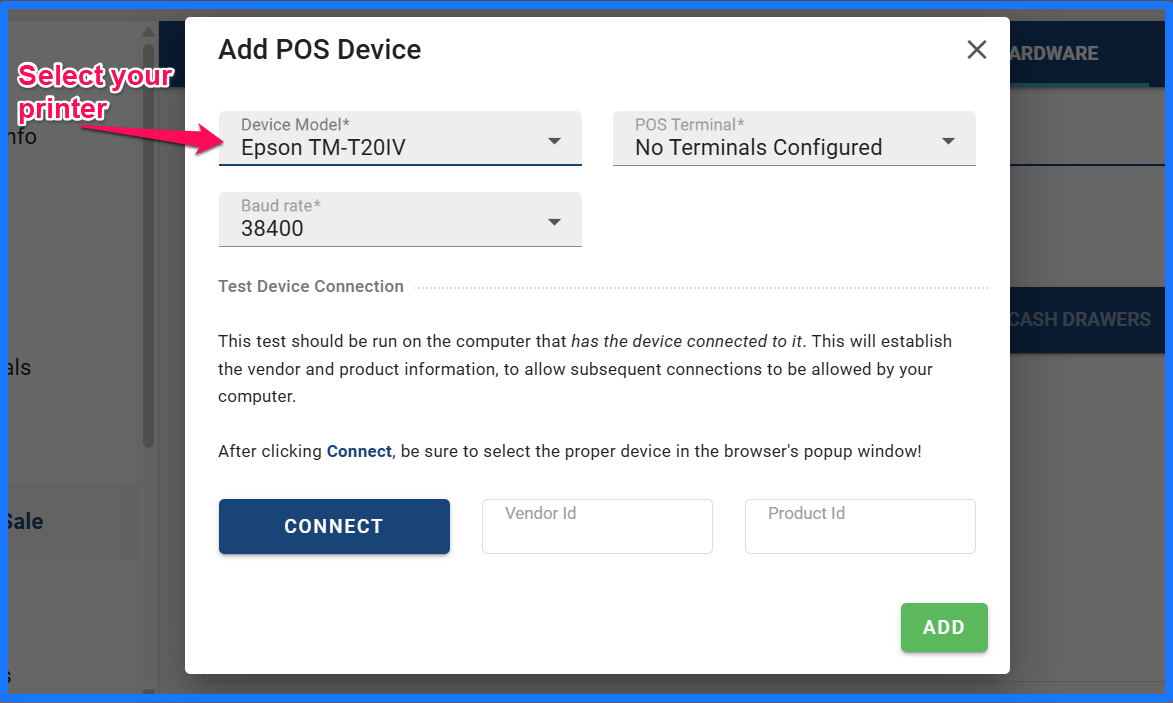
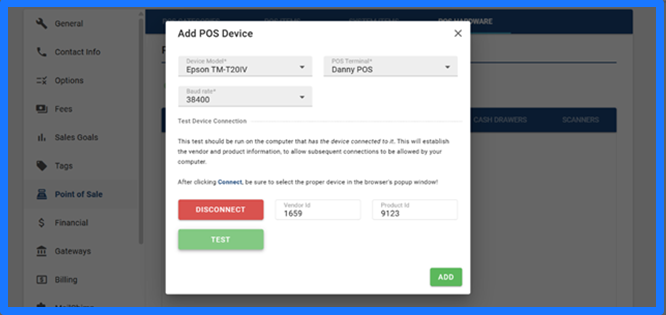
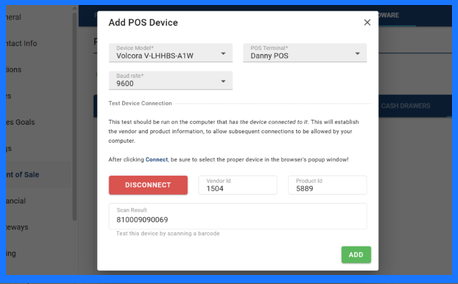
2) On the Add POS Device pop-up window, please first match the make and model of the printer to those listed in the drop-down menu under Device Model.
3) Once the Make and Model are selected, the program will update the Baud Rate automatically to match the given printer type. At this time, click the CONNECT button.
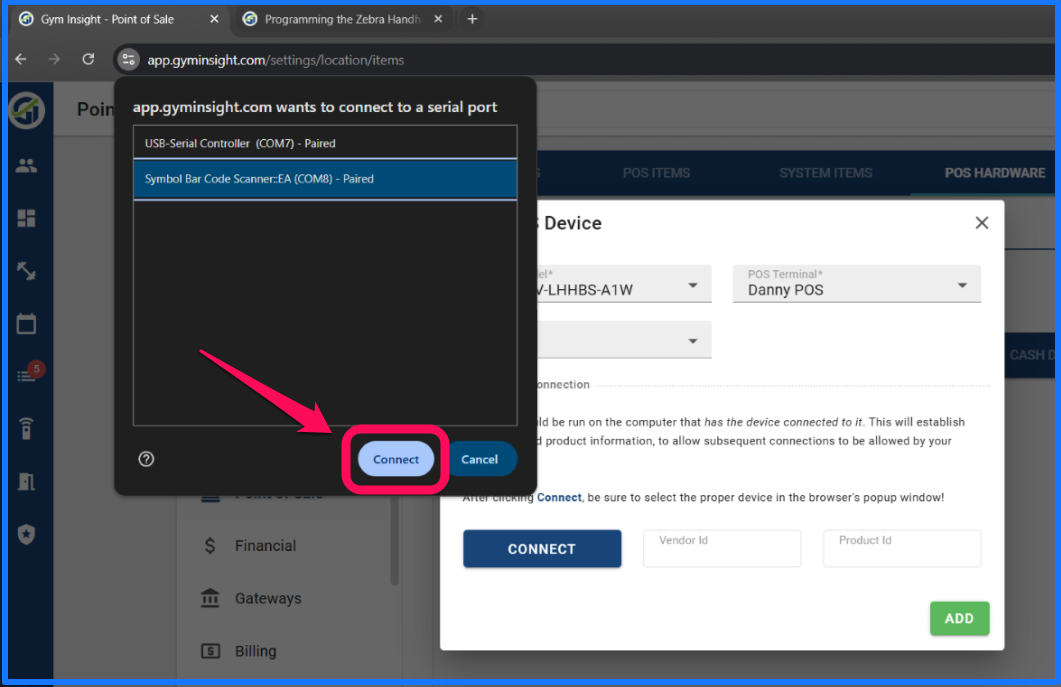
4) Your web browser will then ask you to select the attached device to use for the printer. You may have several devices listed here, depending on what else you may have attached to your computer. Be sure to select the correct device. Once selected, click Connect.
5) The printer will be ready to TEST at this stage, please click test, and a Test print will be spooled by the printer. If successful, click ADD; if unsuccessful, click disconnect, and be sure that the COM port selected was for the printer.
CASH DRAWER
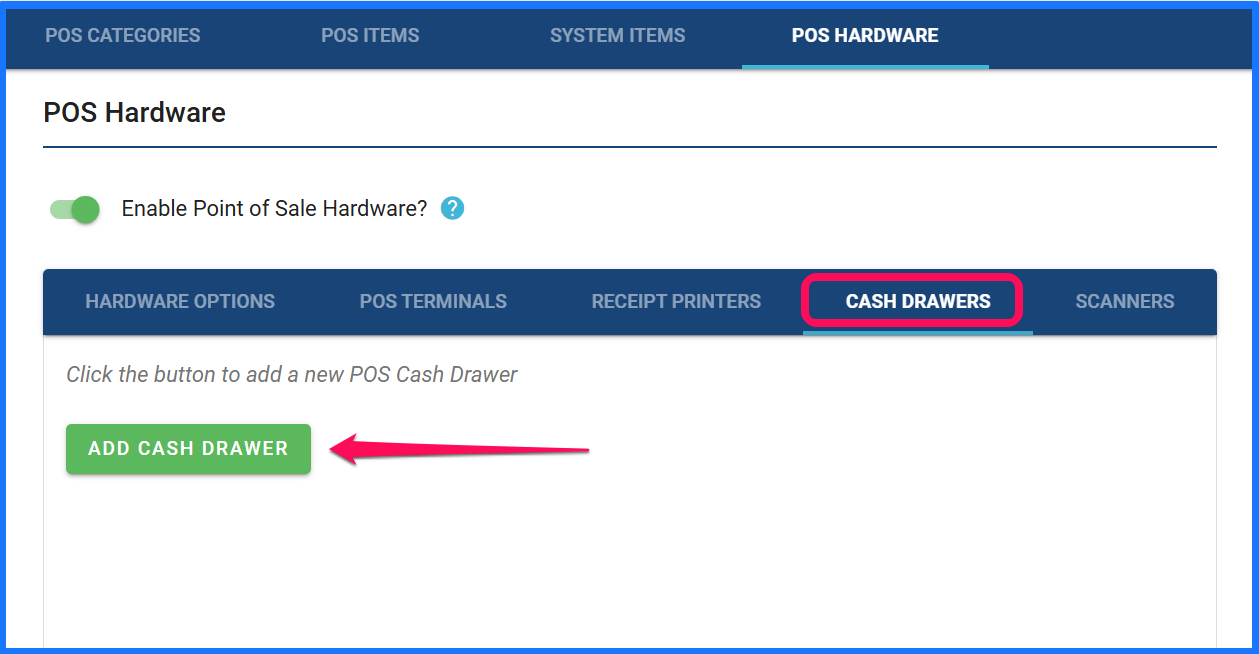
1) To add the Cash Drawer, click the ADD CASH DRAWER button.
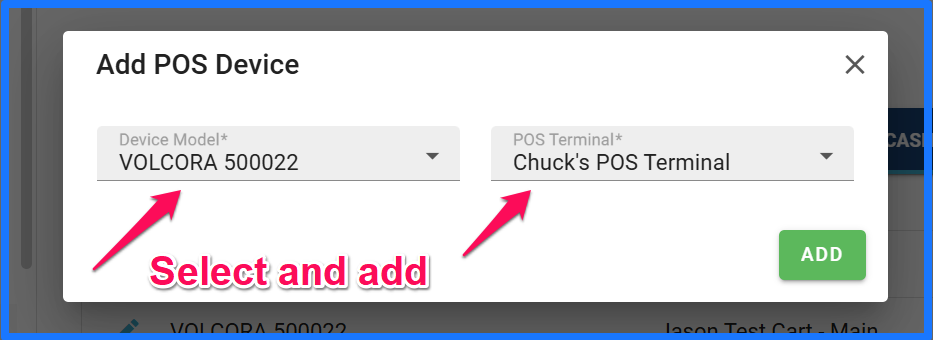
2) The Add POS Device window will pop up. Match the make and model to the Device model drop-down. Click the Test button. If the drawer opens, the test was successful. Click the ADD button.
SCANNERS
Please program scanner using the scanners instruction book or the KB article, programming the Zebra scanner.
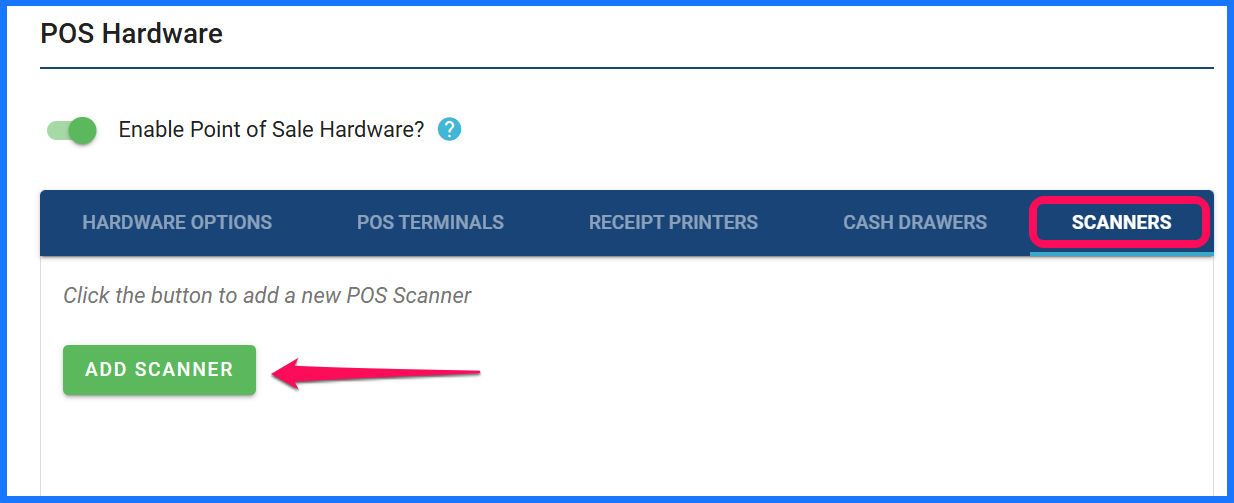
1) In the scanners screen, click the ADD SCANNER button.
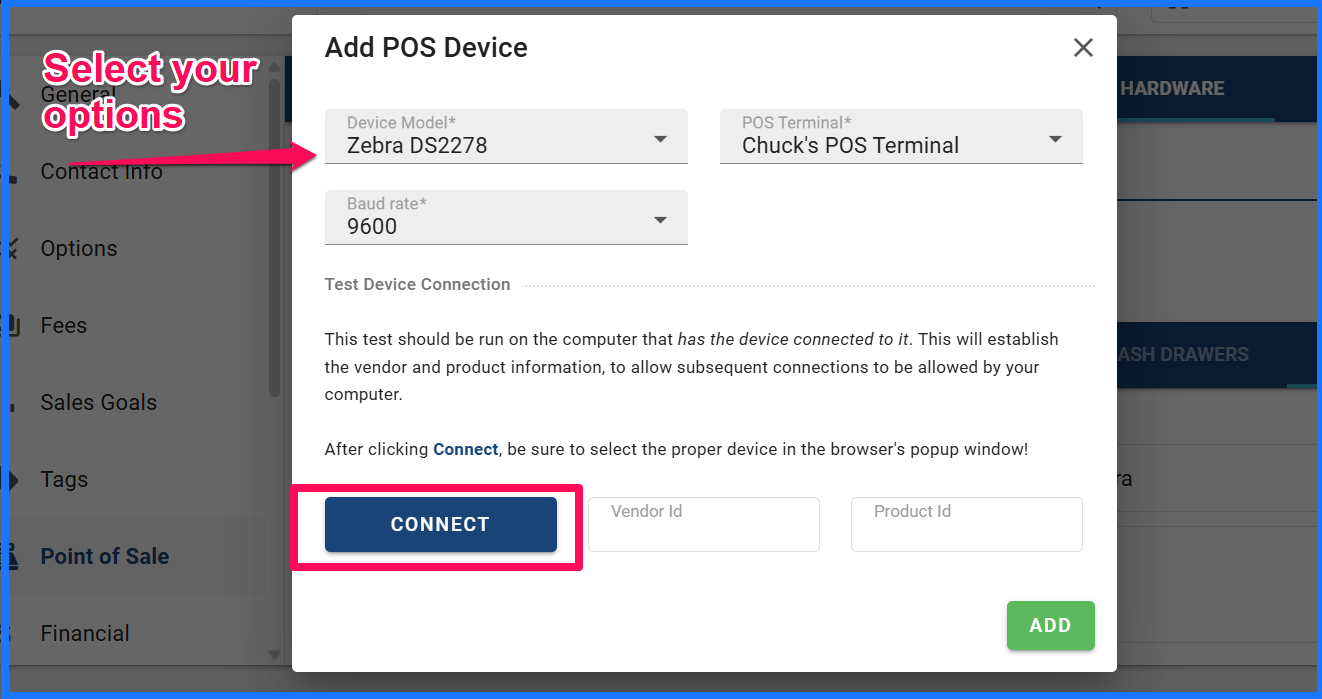
2) In the Add POS Device pop-up window, select the make and model of the scanner from the Device Model drop-down. It will automatically update the Baud Rate to match the respective scanner. Once selected, click the CONNECT button.
3) Once the scanner is selected, click the connect button to select the correct COM port for the scanner. Once selected, click the highlighted Connect button.
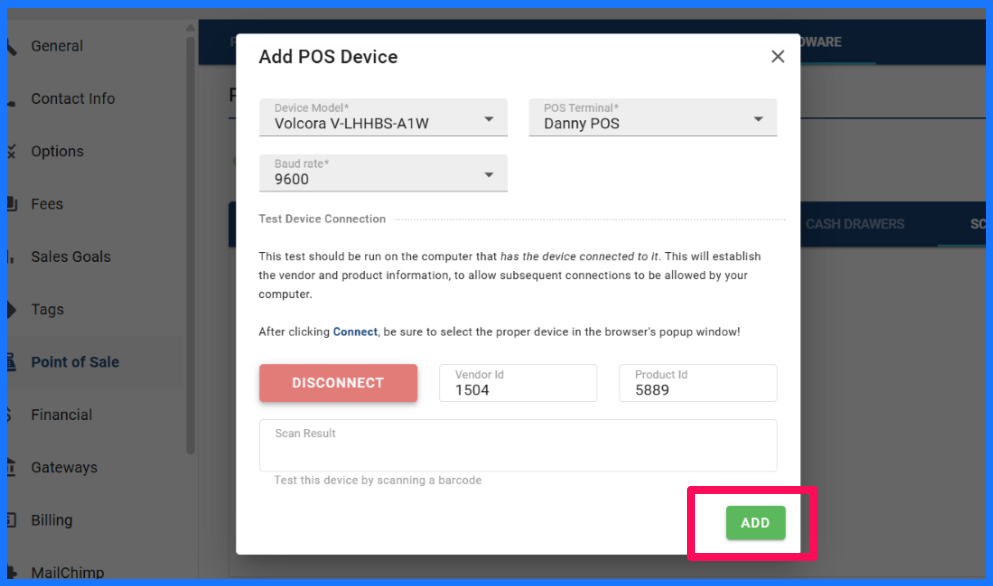
4) Once added, the system will allow you to test the scanner by scanning a UPC or custom barcode.
5) If the scan was successful, the barcode/UPC will have populated in the Scan Results box, if successful click add. If unsuccessful, ensure, like the Printer, that the correct COM port was selected.
POS PERMISSION SETTINGS
In addition to adding hardware to the POS system, the system also has POS permissions, to allow different levels of permissions for each user.
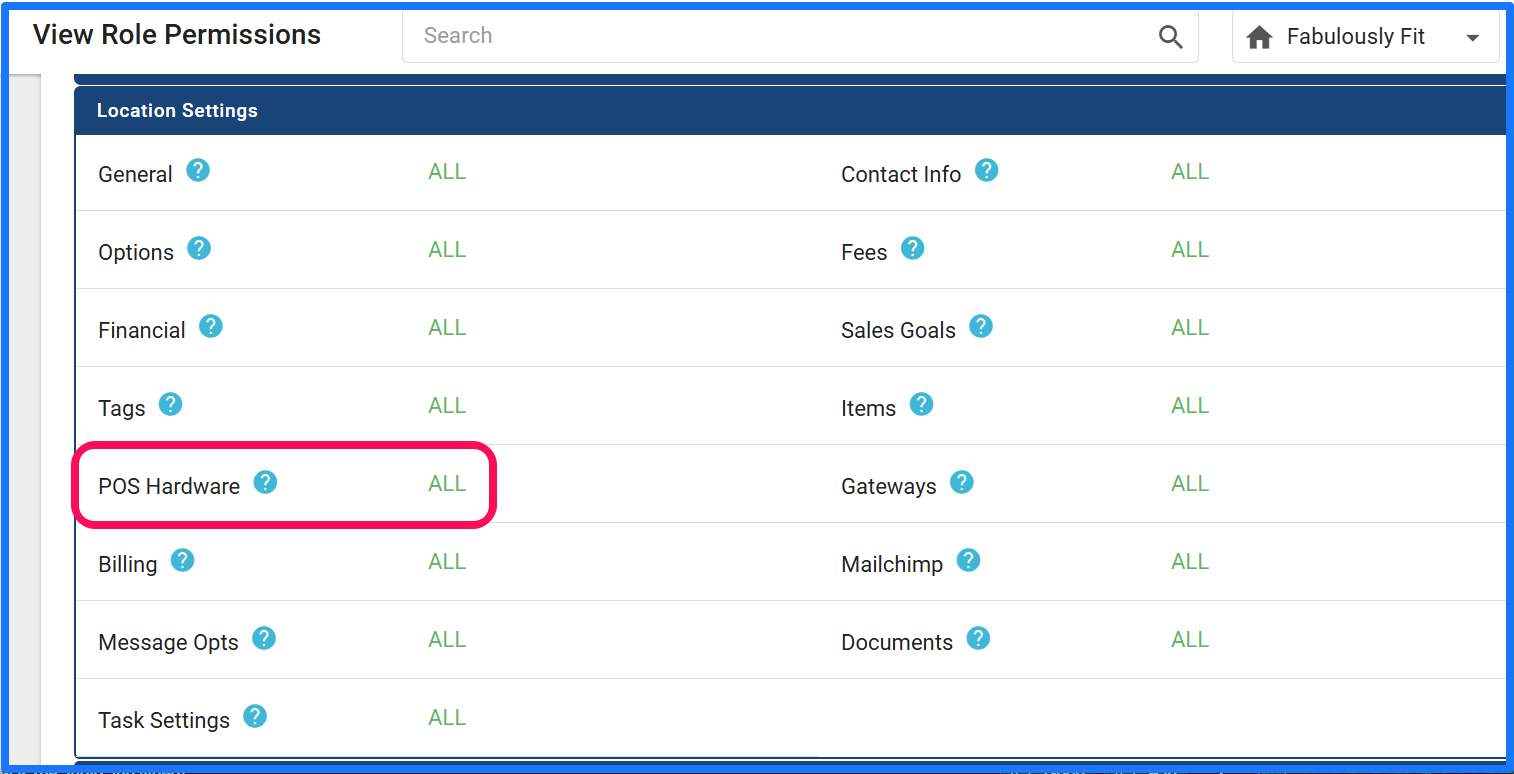
LOCATION Settings- POS Hardware -
Falls into 4 categories of permissions that control settings for the POS Hardware.
None – No access to settings – POS Hardware tab
View – Can view the settings – POS Hardware tab
Edit – Can also Add/Edit POS Hardware
All – Can also Delete POS Hardware
POS Settings
Assign POS Terminal
A: yes or no permission that grants the ability to assign POS terminals to computers via the user menu.
This ability, given to General Manager and above roles by default, allows a POS terminal to be assigned to a computer, once that POS terminal has been added and configured. This can be necessary if the terminal is ever un-set, such as if the browser cache is cleared.
If you are doing an initial setup, or reading about the POS Hardware system please click here to be taken to the final POS Hardware article - Using the Hardware. or review the article on setting up categories, items and UPCs for you POS system.